
फ़ोटोशॉप: पीले टिंट को हटा दें - यह कैसे काम करता है
आप फ़ोटोशॉप में एक पीले रंग की टिंट की तरह अवांछित रंग बदलाव आसानी से निकाल सकते हैं। इस व्यावहारिक टिप में, हम आपको दिखाते हैं कि कैसे आगे बढ़ना है।
फ़ोटोशॉप में पीला टिंट निकालें: रॉ प्रारूप में छवियों के साथ सफेद संतुलन
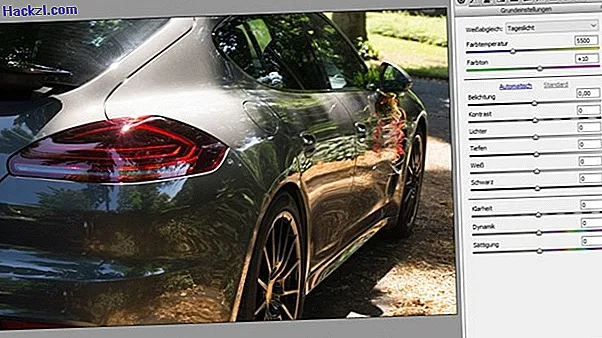
समस्या को हल करने का सबसे आसान तरीका है कि अपनी छवियों को रॉ प्रारूप में रखें। फ़ोटोशॉप के साथ खोलने पर, एक बड़ी संवाद विंडो स्वचालित रूप से दिखाई देती है जिसमें आप सभी प्रकार की चीजें सेट कर सकते हैं।
- ड्रॉपडाउन "व्हाइट बैलेंस" के साथ आप कुछ पूर्वनिर्धारित रंग तापमान से चुन सकते हैं, जो ज्यादातर आपकी तस्वीर के लिए एक उपयुक्त सेटिंग प्रदान करते हैं। रंग परिवर्तन को रोकने के लिए कैमरे पर सफेद संतुलन समायोजित करें।
- वैकल्पिक रूप से, आप निश्चित रूप से अपनी तस्वीर से पीले रंग की टिंग को हटाने के लिए रंग तापमान नियंत्रण के साथ सावधानी से खेल सकते हैं। अंतिम ठीक-ट्यूनिंग के लिए रंग टोन को ध्यान में रखना न भूलें।
- आपके पास आगे एक्सपोज़र सेटिंग्स करने का विकल्प भी है।
पीला टिंट निकालें: सीएमवाईके ग्रेडेशन घटता के माध्यम से समायोजन
यदि आपकी छवि RAW प्रारूप में नहीं है, लेकिन केवल JPG प्रारूप में, आपकी छवि से पीले टोन को निकालने के लिए अभी भी सटीक तरीके हैं।
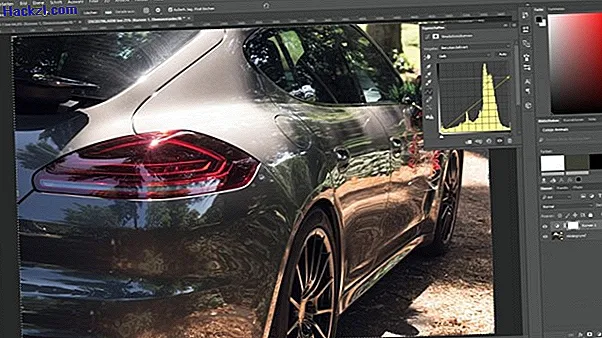
- पहले अपनी छवि को सीएमवाईके प्रिंटिंग स्याही में परिवर्तित करें ताकि आप अलगाव में रंग टोन के रूप में पीले रंग की प्रक्रिया कर सकें। ऐसा करने के लिए, "छवि", "मोड" पर क्लिक करें और अंत में "सीएमवाईके रंग" पर क्लिक करें।
- चूंकि सीजीएमके आरजीबी की तुलना में बड़ा रंग स्थान है, सटीक रंग टन फ़ोटोशॉप द्वारा सराहना की जाती है। यह कलर प्रोफाइल का उपयोग करके किया जाता है। आपको एक अलग डायलॉग बॉक्स में रंगों के रूपांतरण की पुष्टि करनी होगी।
- नए सेटिंग स्तर बनाने और ग्रेडेशन वक्र का चयन करने के लिए स्तर अवलोकन में आधे-भरे सर्कल के साथ बटन का उपयोग करें।
- नई खुली खिड़की में आप निचली ड्रॉपडाउन में रंग पीला चुन सकते हैं। फिर गिनती के ऊपरी दाएं कोने को तब तक नीचे खींचें जब तक आप चित्र का परिणाम पसंद नहीं करते।
फ़ोटोशॉप में पीला टिंट: रंग संतुलन और रंग / संतृप्ति के माध्यम से समायोजन
पीला टिंट को हटाने का एक और सरल लेकिन उपयोगी तरीका है "रंग संतुलन" और "ह्यू / संतृप्ति" स्लाइडर्स का उपयोग करके समायोजन करना।
- आप "छवि" बटन और "सुधार" मेनू आइटम का उपयोग करके "रंग संतुलन" तक पहुंच सकते हैं। "ह्यू / संतृप्ति" एक ही मेनू में पाया जा सकता है। नियंत्रण के साथ खेलें जब तक आप परिणाम पसंद नहीं करते।
- इस क्षेत्र से सभी सेटिंग्स को समन्वित किया जाना चाहिए, जो इस प्रक्रिया को कुछ बोझिल और अनिच्छुक बनाता है। अधिकांश समय, परिणाम ढाल के रूप में अच्छा नहीं होता है क्योंकि कुछ छवि जानकारी खो जाती है।

Adobe Photoshop CC: पहले टेस्ट में इनोवेशन
यह व्यावहारिक टिप आपको दिखाता है कि फ़ोटोशॉप के साथ आंखों का रंग कैसे बदलना है।