
फ़ोटोशॉप: कैसे ज्वाला पैदा करने के लिए
हम आपको विस्तार से दिखाते हैं कि इस मैनुअल में फ़ोटोशॉप के साथ लपटें कैसे बनाई जाती हैं।
फ़ोटोशॉप में ज्वाला बनाएँ: यहाँ बताया गया है कि कैसे
- फ़ोटोशॉप में एक छवि खोलें जिसे आप लपटों के साथ जीवन में लाना चाहते हैं।
- पहले लेयर को डुप्लिकेट करें और ऊपरी लेयर को सक्रिय करें। मेनू "फ़िल्टर" और आइटम "रेंडरिंग फ़िल्टर" के माध्यम से प्रकाश प्रभाव के लिए संवाद विंडो खोलें। पूर्वावलोकन विंडो में, सर्कल को स्थानांतरित करें ताकि केंद्र बाती के ऊपर हो।
- प्रकाश के प्रकार और रंग के रूप में एक उज्ज्वल नारंगी के रूप में "स्पॉट" का चयन करें। तीव्रता स्लाइडर को 25 पर सेट करें और फ़ोकस स्लाइडर को -100 पर सेट करें। आप गुणों के लिए एक मध्यम भूरे रंग का उपयोग कर सकते हैं। बस ग्लोस और एक्सपोज़र को 0 पर छोड़ दें, सामग्री को 70 तक खींचें, 10 से परिवेश। जब तक आप परिणाम से संतुष्ट नहीं हो जाते तब तक सेटिंग्स के साथ खेलें।
- अब आपको फिर से एक नए स्तर की आवश्यकता है। अग्रभूमि का रंग हल्के पीले रंग में सेट करें। इल्ली के चारों ओर एक दीर्घवृत्त खींचने के लिए एलीप चयन उपकरण का उपयोग करें। अब हल्के पीले से पारदर्शी तक एक ढाल के साथ चयन भरें। उन क्षेत्रों को हटाने के लिए एक नरम इरेज़र का उपयोग करें जिन्हें आप हाइलाइट नहीं करना चाहते हैं। परत के मोड को "गुणा नकारात्मक" में बदलें।
फ़ोटोशॉप: ज्वाला बना
फायरलाइट अब तैयार है, लेकिन लौ को अभी भी जलाया जाना चाहिए।
- ब्रश उपकरण के साथ एक नई परत पर हल्की पीली लौ पेंट करें। थोड़ा नारंगी और लाल टन लौ को यथार्थवादी बनाते हैं।
- एक लौ की टिमटिमा "ब्लर फिल्टर" के तहत "मोशन ब्लर" फिल्टर के साथ बनाई गई है।
- आग की विशिष्ट चमक अभी भी गायब है। इसे बनाने के लिए, एक नई परत बनाएं और एक नारंगी अग्रभूमि रंग से बाती के ऊपर पारदर्शिता के लिए रेडियल ग्रेडिएंट खींचें।
- परत मोड को "सामान्य" से "नकारात्मक गुणा" में बदलें और अस्पष्टता को थोड़ा कम करें।
- तीन और चार चरणों को दोहराएं, केवल इस बार अग्रभूमि रंग के रूप में सफेद चुनें। अब आपको गर्म चमक के साथ एक यथार्थवादी लौ का निर्माण करना चाहिए।
नवीनतम वीडियो
प्रकाश प्रभाव से आपको आग की पहली चमक मिलती है।

लौ अभी भी थोड़ा अंधेरा दिखता है और इसमें चमक की कमी है।
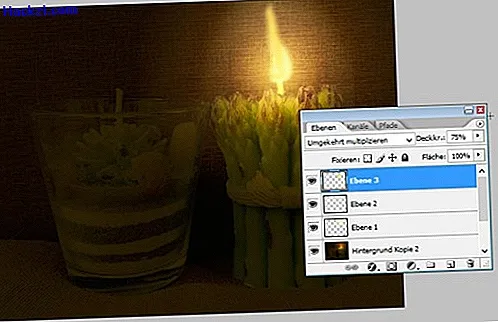
रेडियल लेवलिंग टूल से आपको फिनिशिंग टच मिलता है।
