
Gimp के साथ 3D फ़ॉन्ट बनाएं - यह कैसे काम करता है
जिम्प के साथ आप अपने फोंट को एक ठाठ 3 डी प्रभाव दे सकते हैं। हम आपको दिखाएंगे कि छवि संपादन टूल के साथ ऐसा कैसे करें।
जिम्प: 10 चरणों में 3 डी फॉन्ट बनाएं
चाहे निमंत्रण हो, हैंडआउट हो या आपकी खुद की वेबसाइट - 3 डी टेक्स्ट लगभग हर जगह एक बेहतरीन आई-कैचर है। आप हमारी पिक्चर गैलरी में फिर से जिम्प के निर्देशों के जटिल चरणों को समझ सकते हैं।
- जिम्प में एक नया ड्राइंग क्षेत्र खोलें और टेक्स्ट टूल का उपयोग करके वांछित अक्षर दर्ज करें। एक अंधेरे पृष्ठभूमि पर एक प्रकाश फ़ॉन्ट का उपयोग करना सबसे अच्छा है।
- फिर पर्सपेक्टिव टूल का चयन करें और अपने टेक्स्ट को थोड़ा पीछे झुकाएं। जैसे ही आप परिणाम पसंद करते हैं, "रूपांतरण" पर क्लिक करें।
- पाठ परत पर राइट-क्लिक करें और प्रविष्टि "डुप्लिकेट परत" के लिए देखें। इसे छिपाने के लिए नई परत पर आंख आइकन पर क्लिक करें।
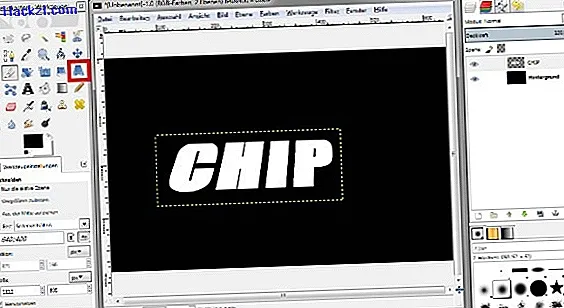
- अब यह मूल पाठ स्तर पर वापस आ गया है: प्रविष्टि पर राइट-क्लिक करें और "अल्फा चैनल से चयन" विकल्प चुनें।
- अब पाठ को थोड़ा गहरा रंग दें। आप इसे भरण उपकरण के साथ या "रंग"> "Colorize" के साथ कर सकते हैं।
- फिर "चयन"> "कुछ भी नहीं" के माध्यम से फिर से चयन रद्द करें।
- टेक्स्ट लेयर को फिर से राइट-क्लिक करें और "लेयर टू इमेज साइज" विकल्प चुनें।
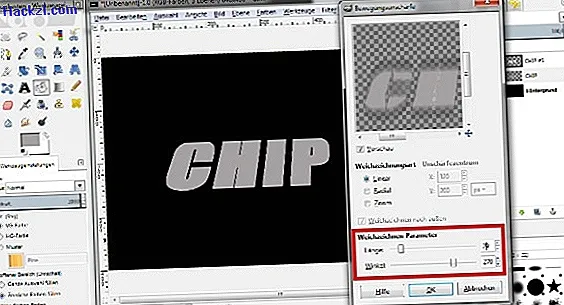
- "फिल्टर"> "कलंक" के तहत आप प्रविष्टि "मोशन ब्लर" चुनते हैं। स्लाइडर को "लंबाई" के लिए "27" पर और "एंगल" के लिए "270" पर सेट करें। फिर "ओके" पर क्लिक करें।
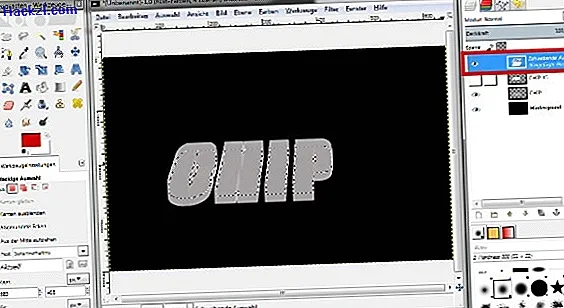
- अब कुंजी संयोजन [Ctrl] + [C] का उपयोग करके टेक्स्ट क्लिप को अपने क्लिपबोर्ड पर कॉपी करें। फिर परत को सम्मिलित करने के लिए कुंजी संयोजन [Ctrl] + [V] ३० से ४० बार दबाएं। फ़ॉन्ट को धीरे-धीरे 3 डी प्रभाव पर ले जाना चाहिए।
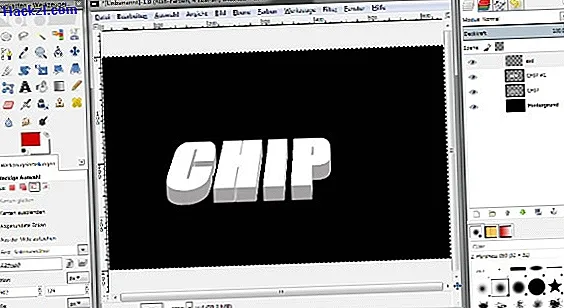
- अंत में, पहले से छिपी हुई परत पर आंख के प्रतीक को सक्रिय करें। 3D प्रभाव अब समाप्त हो गया है।
हम आपको हमारे चित्र गैलरी में सभी चरणों को स्पष्ट रूप से दिखाएंगे।
नवीनतम वीडियो
आप परिप्रेक्ष्य उपकरण का उपयोग करके अपने पाठ को पीछे की ओर झुका सकते हैं। जब तक आप परिप्रेक्ष्य से खुश न हों, तब तक यहां सेटिंग्स के साथ खेलें।
आपके द्वारा टेक्स्ट लेयर को डुप्लिकेट और रंगीन करने के बाद, "मोशन ब्लर" फ़िल्टर लागू करें। लंबाई और कोण के लिए सही मान यहां महत्वपूर्ण हैं।
फिर 40 बार तक परत को डुप्लिकेट करें। ऐसा करने का सबसे तेज़ तरीका कुंजी संयोजन [Ctrl] + [C] और उसके बाद [Ctrl] + [V] का उपयोग करना है। जितना अधिक आप परत डालते हैं, उतना बेहतर 3 डी प्रभाव दिखना चाहिए।
अंत में, पहली परत की प्रतिलिपि फिर से दिखाएं। आपका 3D पाठ अब तैयार है और आप इसे सहेज सकते हैं या किसी अन्य छवि पर कॉपी कर सकते हैं।
